Gallery Image Setup (copy & paste method)
Website template support for photo gallery setup

In Allwebco templates, there are a couple of ways to setup the gallery images. The method outlined on this page is to copy and paste over the .jpg images. Another option is the "file overwriting" method.
See Instead…
Note: In gallery pages, the closeup image view height and width sizes are not defined in the html code. This allows for any size closeup images to be used and also allows responsive templates to resize the images as the viewing area decreases. In responsive templates, closeup image maximum sizes are edited in the "style.css" and use "max-width" css.See Instead…
Replacing gallery images (copy & paste)
Full sized closeup images start with a capital "F" in the name (Fgallery[X]-[X].jpg) and are located in the "gallery" folder.
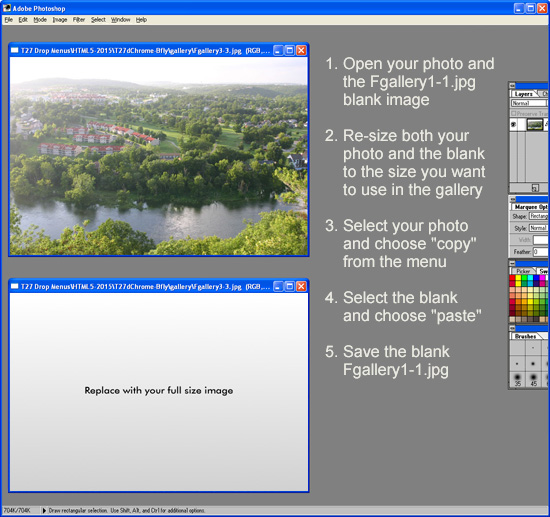
Open the "Fgallery[X]-[X].jpg" image you want to edit in your graphics software. We'll open the "Fgallery1-1.jpg" in this example. Open the photo you want to use as the replacement. Edit your photo to a similar size of the "Fgallery1-1.jpg". In Photoshop use "image", "image size" on the menu. Once the size is close, do a "select all" on your photo, choose "edit" "copy", select the "Fgallery1-1.jpg" by clicking anywhere in the window and choose "edit", "paste". Save the Fgallery1-1.jpg and the gallery page will be updated.
Important: Hosting areas are case sensitive. Name your files to exactly match the existing gallery images or edit the gallery .htm pages with your exact image names. For example, "Fgallery1-1.jpg" and "Fgallery1-1.JPG" (upper case extension) are not the same when uploaded. Different letter case may work fine on your local drive, but once uploaded gallery images may not display.
Note: If your template uses popups for the image closeups, you can increase the size of the popup window. See your template "help.html" for details.
Related Topics:
Gallery Setup Overview
Editing Thumbnails